Hey folks! If you are interested in playing volleyball but are totally new to it, this must have been one of the first doubts in your mind – “I don’t know how to hit it. It looks so difficult and complex”.
Well, I am not gonna lie, I had the same thoughts too. Everyone does. Unlike basketball, where you know that you have to bounce the ball down using your hand, volleyball uses palm, fingers, forearms, legs and for some creative players, even their lower backs!
The game demands you to hit the ball. Whether you are a complete beginner or an experienced player, let’s start from the basics and slowly break down the complexity.
BASICS OF HITTING
Let us talk about how to make contact with the ball using your hands and arms. You will encounter various situations in which to hit the ball, and your hitting style will vary based on them. Let us understand how to tackle the 4 important scenarios.
Scenario 1: The ball is over your head, and you need to hit it with one hand.
Raise your arm, bend your elbows but not so much that you can’t reach the ball over you. Now, with your fingers spread out wide, hit the ball firmly with the palm of your hand. Hit the ball in its centre so that it follows a trajectory over the net. Make a follow through post hitting the ball such that your arm is extended towards the net. Use this technique to serve a ball overhead or to hit a slow ball in the air over your head. If the ball is coming at you fast, as a beginner, you should not use this technique. To learn how to serve a ball in detail, check this out – “internal link”.
Scenario 2: The ball is coming towards you at a fast pace at waist height.
Remember your objective. It is to keep the ball in play. Widen your stance, bend your knees and extend your arms in front of you and clasp your hands together as shown in the figure below. The elbows should not bend and keep your forearm tight. The goal is to hit the ball from your forearms (the area between elbow and wrist). Most important is to make sure that your forearm is pointing upwards and not sideways. You have to get clean contact with the ball for best results.
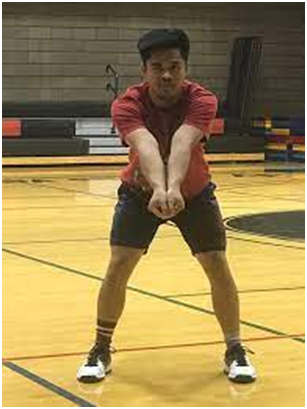
There are two ways you can clasp your hands:
- Make a fist with one hand and wrap the other hand around it.
- Place one hand’s fingers over another forming a V shape that points away from you. Bend both hands at the knuckles and use both thumbs to cover the palm. The thumbs are adjacent to each other with both of them pointed away from you. (Refer to the image above)
But do note that your forearm should be pointing upwards however way you clasp your hands and the elbow should be locked in extended position.
Finally, when the ball comes, just use the forearms to make contact with the ball to send it back or to give it height for another teammate to hit. You don’t have to hit the ball hard or follow through, you just have to place your forearms like a wall to change the direction of the ball. However, if the ball has very slow pace, you may need to add some momentum to it by using your shoulders to move your forearms.
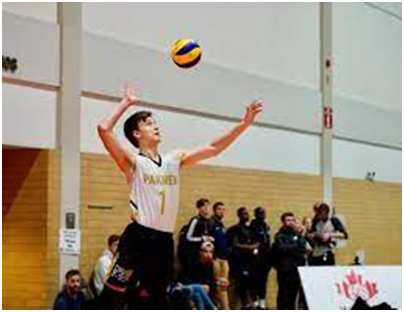
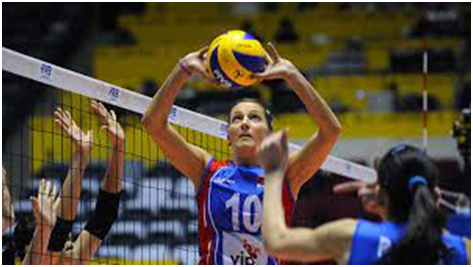
Scenario 3: You want to pass the ball to your teammate so that he can attack the ball to score a point.
This is known as Setting the ball. You “set” the ball for your teammate to attack or spike it. This is usually the second hit of the 3 hits that your team makes to send the ball to the opponent. This touch is often very precise and requires a lot of practice. So don’t worry if you don’t get it right.
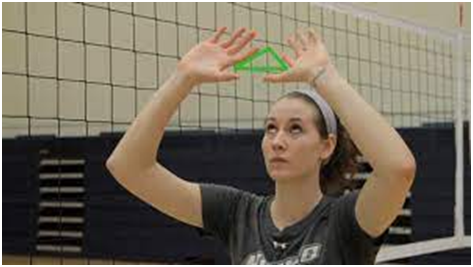
To perform a set, get into a good position to meet the ball slightly over your head. Now, spread your fingers out wide and form a triangle with your index fingers and thumbs. The ball will arrive in this triangle and your fingers will act like a spring to release the ball. You may also need to use some power from your wrist and by extending your arms. Make sure to not catch the ball, but to just absorb the impact of the incoming ball and send it back into the air in a continuous movement.
To learn how to set a ball in detail, check this out – “internal link”.
Scenario 4: You are attacking the ball to score a point
This is known as “Spiking”. This is usually the 3rd and the last hit before the ball should be sent to the opponent’s side.
The contact with the ball is the same as in Scenario 1. The only difference is that this time, you want to hit the ball after jumping with more power and contact the ball at an angle so that it goes down towards the ground in the opponent’s court. Most spikes involve a run up before the hit and for that, you run up in 2-3 steps towards your spike position and use your forward momentum to lift off from both legs together to jump and hit the ball. You need to jump in order to have your hitting hand above the net’s height, otherwise you will end up hitting the ball in the net and losing the point.
To learn how to spike a ball in detail, check this out – “internal link”.