Hey folks! Welcome back to learning volleyball. Today we are going to talk about serving the ball. The serve kicks off every rally but is one of the toughest volleyball skills to master.
WHAT IS A SERVE?
A serve is a hit on the ball to put it into play and start the volleyball rally. The team that wins the previous point gets to serve the ball for the next one.
WHY LEARN THE SERVE?
- A good service gives an advantage to the serving team. If you serve a ball which is difficult for the other team to return, you already have the upper hand in that rally.
- It is the only skill that is controlled solely by one player. Hence, it improves your overall value towards the team. Aside from being excellent at your position of play, you can be more dangerous if you master your serve.
- Every player has to serve during the game and a team can lose points if a player is unable to serve the ball or makes a weak serve. You do not want to be a liability for the team. Hence, it is crucial for every player to know how to serve well
DIFFERENT TYPES OF SERVES
There are different types of serves seen across volleyball.
- The Underhand Serve
This is a great serve for beginners as it doesn’t require a lot of strength and practice. In this serve, you hit the ball just above your waist. Your hands will be in a fist position while hitting.
2. The Overhand Serves
This is the most common serve in competitive volleyball. In this serve, you hit the ball in front of and slightly above your face. You will hit the ball using your palms.
a. Basic Serve
The basic overhand serve. You stand behind the back court line and serve the ball with little or no run up.
b. Jump Serve
In the jump serve, the player tosses the ball higher than the standard serve and jumps upward to hit the ball mid-air. This allows the server to hit the ball with more power and increased service height.
c. Float Serve
The float serve is a level up from the basic serve where you try to hit the ball with zero rotation, which results in the ball moving unpredictably towards the opponent and causing difficulty for them while returning.
d. Topspin Serve
The topspin serve is the most used serve variation in competitive matches. The topspin means that the ball drops towards the ground much quicker than usual as it crosses the net, and this is what makes it a deadly serve. You can now serve with more power without the fear of the ball going out of bounds behind the back court line.
NOTE: If you and your pals are complete beginners, I suggest that you learn the underhand serve first since it is easier to serve and also easier to return. This way you will have more rallies and get a good feel for the sport. After 5-10 games, you will have decent control over the underhand serve. Post that, try to move to the overhand serve as soon as possible. As your playing level increases, the underhand serve will prove to be very easy to return for the opponent and you will end up giving them more chances to kill the rally after a weakish underhand serve. With the overhand serve in your skillset, you have the scope to add more variations (float, topspin) to your serve and win more points. Hence it is no surprise that the overhand serve is the most commonly used serve in volleyball matches.
BASIC RULES WHILE SERVING
- Serve from behind the back line. If you encroach the back line before or while hitting the ball, it is a foul.
- The serve should only be hit by the hand.
- The ball should travel over the net and in between the two antennas.
- If the service lands out of bounds of the opponent court without any touch by the opponent, the ball is called out of play and the opponent team earns a point.
- The right back player of the serving team is the first server.
- When you win a point on the opponent’s serve, your team gets the serve. But before you start the next point, all the players rotate one position clockwise. Now a new player is at right back and this way, each player on the team gets to serve the ball based on a rotation-based approach. Refer to this article to understand rotation *internal link*.
- Time violation while serving. The server gets 5 seconds to serve the ball after the referee sounds the whistle. A failure to do so would result in a point being awarded to the opponent team.
- If the serve touches the net on its way through to the opponent, the serve is considered in-play.
Now, let us get to learning the serves.
NOTE: I am going to teach all the serves for a right-handed player. If you are left-handed, just reverse the left and right directions.
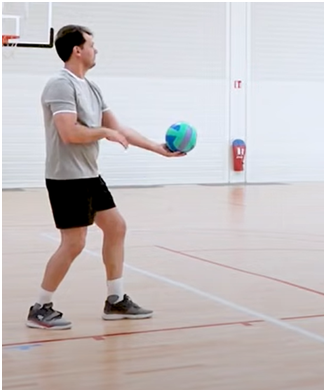
HOW TO DO UNDERHAND SERVE?
Step 0: Positioning
Stand behind the back court line and roughly near the middle of the court to start with. Have a rough target of the opponent’s court in mind where you want to send your serve to.
Step 1: The Stance
While serving the ball, there is a weight transfer within our body, from the rear side to the front side. This helps in transferring the body’s momentum to the ball and applying power from the full body rather than just the arms. The key to an efficient serve is efficient weight transfer.
Stand easily on both legs as shown in the figure below. Both legs form a ‘V’ shape with the left leg slightly in front of the right leg. Point your front leg in the direction you want to hit your serve. Shift your weight slightly towards the right leg. This is the basic stance.
Do not use the ball for the first 50 attempts.
Step 2: Weight Transfer
Now transfer the weight from the right leg onto the left leg. Ideally, you have to transfer 100% of your weight on one leg, but if you are unable to maintain balance, start with transferring 60-70% of your weight each time. Practice this 20 times and then only move to step 3.
Every time you serve underhand or any standing serve for that matter (which excludes the serves you do while jumping), start with this stance.
Step 3: The Arm Swing
Put your left hand in front of you, pretending to hold the ball. Now, swing your right arm back and bring it in front to hit the imaginary ball in your left hand. Practice swinging the right hand back and forth.
Make sure that your swinging of the right hand is in alignment with the weight transfer taught in step 2. As you swing your right arm back, the weight should be transferred to the right leg. And as you swing your right arm forward, transfer weight to the left leg in the front.
Step 4: Hold the ball
Note that in this step we are not tossing the ball nor hitting it. We are just holding the ball out in front in our left hand and practice the two previous steps. The goal is to ensure the ball stays balanced throughout the arm swing and weight transfer. Don’t grip the ball too tightly. Keep the fingers beneath the ball loose but supportive.
Step 5: Ready the right hand for hitting
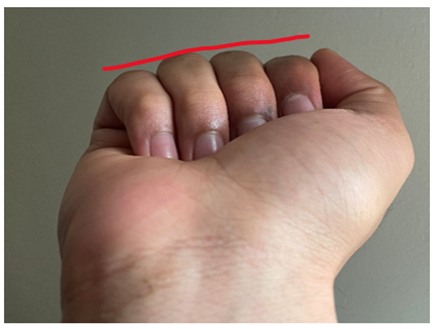
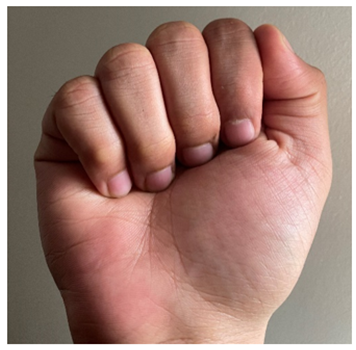
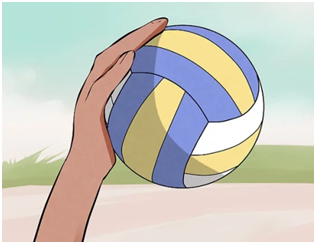
Now we will make the hitting fist on our right hand. Make a tight fist, with the thumb at the side. We want to maximize the surface area (highlighted in red in the first image) of our fist in contact with the ball and hence you shouldn’t place the thumb on top of the bent fingers. Follow the images given below.
Once you have got the first ready, practice the combination of all 4 steps by transferring weight, swinging your arms back and forth, and finally hitting the ball at the end of the motion.
This completes your underhand serve. Remember that the underhand serve is just a means to start off and once you are fully comfortable with it, I suggest you move to the overhand serve if you want to improve your level quickly.
HOW TO DO BASIC OVERHAND SERVE?
Step 0: Positioning
Stand behind the back court line and roughly near the middle of the court to start with. Have a rough target of the opponent’s court in mind where you want to send your serve to.
Step 1: The Stance
Stand easily on both legs as shown in the figure below. Both legs form a ‘V’ shape with the left leg slightly in front of the right leg. Point your front leg in the direction you want to hit your serve. Shift your weight slightly towards the right leg. This is the basic stance.
Step 2: The Toss
The toss is one of the most, if not the most crucial aspect of the overhand serve. As opposed to the underhand serve where the ball is not really tossed into the air before hitting it, the overhand serve involves tossing the ball up and waiting for sometime before hitting it. This makes the toss very important to the overall serve.
To toss the ball, hold it in your outstretched non-dominant hand in front of you. Don’t bend your arm while holding the ball. And make sure that your wrist is flat. We don’t want to flick the wrist for tossing the ball. We want to just lay it upwards using the palm. But don’t worry if it flicks a little in the beginning. Let it happen.
- Toss the ball in front of your right shoulder, so that you can hit it in the air with the right arm
- Don’t toss the ball too high while you are a beginner. Toss it to around 2-3 above your head.
Step 3: The Step Forward
After you toss the ball up, step forward and transfer all your weight from the right leg at the back to the left leg at the front. This helps generate some momentum for hitting the ball later on. Since you tossed the ball in front of you, the forward step also helps you to move closer to the ball for hitting.
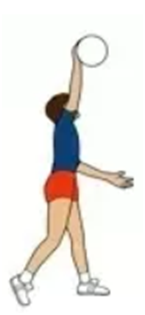
Step 4: The Arm Swing
When your left hand is holding the ball, keep your right hand in a ready position. We will hit the ball with an extended right hand over and slightly in front of our head. Our position while hitting the ball looks like this:

Step 5: Hitting the ball
We will hit the ball as if we are giving it a firm “High 5”. You need to keep a big straight hand and contact the ball with your PALM. Make sure that your hand is firm and not sloppy.
HOW TO DO OVERHAND FLOAT SERVE?
The float serve is a type of serve that appears like “floating” above the net. The serving player aims to not add any rotation/spin to the ball. The spin on the ball makes it path predictable. Click here to know why (link to internal article about rotation and spin).
Hence, to make the path unpredictable, the server doesn’t apply any rotation to the ball and the ball goes towards the defender while moving in random directions in the air, which is tough to interpret.
Here is how to do the float serve:
Step 0: Positioning
Stand behind the back court line and roughly near the middle of the court to start with. Have a rough target of the opponent’s court in mind where you want to send your serve to.
Step 1: Stance
Start with the basic stance we have learnt about. Your feet are in “V” or “L” shape with your left foot facing the net. Shift your weight on your rear (right) leg.
Step 2: Toss
Outstretch your left arm holding the ball and the ball should be in front of your HITTING (right) shoulder. Many mistakenly hold the ball straight in front of their left shoulder and that is a big NO.
Keep your wrists strong, hand firm and fully open. For a float serve, we don’t want to add any kind of rotation to the ball. Hold the ball in the palm of your hand (and not from your fingers) and just lift it up. IMPORTANT: Don’t snap your wrists, otherwise that will add a rotation to the ball. Keep your wrists firm and just lift the ball from your palm.
Toss the ball like in the basic overhand serve, about 2 feet above your head and slightly in front of your right shoulder.
Step 3: The Step Forward
After you toss the ball up, step forward and transfer all your weight from the right leg at the back to the left leg at the front. This helps generate some momentum for hitting the ball later on. Since you tossed the ball in front of you, the forward step also helps you to move closer to the ball for hitting.
Step 4: The Arm Swing
When your left hand is holding the ball, keep your right hand in a ready position. We will hit the ball with an extended right hand over and slightly in front of our head. Our position while hitting the ball looks like this:

Step 5: Hitting the ball
We will hit the ball as if we are giving it a firm “High 5”. You need to keep a big straight hand and contact the center of the ball with the middle of your PALM. Make sure that your hand is firm and not sloppy. We want just one clean hit on the ball with one contact point.
HOW TO DO OVERHAND TOPSPIN SERVE?
The topspin serve is a type of serve where the ball is served with, as the name suggests, topspin applied to it. Topspin means applying a forward spin on the top of the ball, in the direction of the ball’s movement. This rotation causes the ball to have a dip while moving and hence, it falls down on the ground quicker than a serve without topspin.
Step 0: Positioning
Stand behind the back court line and roughly near the middle of the court to start with. Have a rough target of the opponent’s court in mind where you want to send your serve to.
Step 1: Stance
Start with the basic stance we have learnt about. Your feet are in “V” or “L” shape with your left foot facing the net. Shift your weight on your rear (right) leg.
Step 2: Toss
Outstretch your left arm holding the ball and the ball should be in front of your HITTING (right) shoulder. Many mistakenly hold the ball straight in front of their left shoulder and that is a big NO.
The toss is slightly different from that in the basic overhand serve. Toss it about 2-3 feet above your head but not in front of your right shoulder. Toss the ball so that you are able to hit it almost directly above your right shoulder.
Step 3: The Step Forward
After you toss the ball up, step forward and transfer all your weight from the right leg at the back to the left leg at the front. This helps generate some momentum for hitting the ball later on. Since you tossed the ball in front of you, the forward step also helps you to move closer to the ball for hitting.
Step 4: The Arm Swing
When your left hand is holding the ball, keep your right hand in a ready position. We will hit the ball with an extended right hand over our head. Unlike the float or basic serve, we will contact the ball not so much in front of our head.
Step 5: Hitting the ball
Unlike the float serve, you will use your fingers alongside the palm to hit the ball. Your wrists will not be firm, but they will be free to move. Keeping your right elbow straight, contact the ball slightly below the center of the ball with your palm and simultaneously snap your wrist so that your hand wraps over the ball. Your hand will resemble a claw at this point. This snapping towards the end of the hitting is what applies the spin to the ball. I recommend practicing spinning the ball in your free time to get a hang of the claw-and-snap movement.
HOW TO DO BASIC JUMP SERVE?
An overhand jump serve is performing a basic overhand serve while jumping to increase the power and angle on the serve. This serve is tougher to perform but more rewarding too.
Step 0: Positioning
Since you will hit the ball while in the air, you will need a few extra steps to run and execute the serve. Hence start by standing a few feet behind the baseline. For starters, walk back 4 big steps from the backline and start there.
Step 1: The Stance
Use the basic stance as taught in the above serves. Stand easily on both legs with both of them forming a ‘V’ shape with the left leg slightly in front of the right leg. Point your front leg in the direction you want to hit your serve. Shift your weight slightly towards the right leg.
Step 2: The Toss
Keep in mind that you will toss the ball first and then think about approaching the tossed ball to hit it. If you combine the two, your rhythm is likely to go off. So first, just think about tossing the ball.
Note that we have to meet the toss mid-air, after jumping off from the ground. Hence, you should aim the toss higher and further in front than you do in the standing serve. A general rule of thumb is to aim the toss so as to hit it right in front of the backline. This is because you will take off from behind the backline, hit the ball and then land inside the court. The service rule only requires that you start your jump from behind the back line.
Toss the ball approximately 5 feet up into the air and 5 feet in front of you. Keep experimenting with these distances based on your run up, speed and jump.
You may use any of your hands to toss the ball.
Step 3: The Approach
Now that the toss is underway, we need to make a small run up and jump to hit the ball while in the air. The three-step approach is an excellent way to serve the ball. Find it here.
Step 4: Hitting the ball
When you meet the ball mid-air, hit it with an open and firm arm. Make sure the trajectory of the ball after hitting is such that it crosses the net.
HOW TO DO OVERHAND JUMP FLOAT SERVE?
The jump float serve is a direct combination of the jump serve and the float serve.
Step 0: Positioning
Since you will hit the ball while in the air, you will need a few extra steps to run and execute the serve. Hence start by standing a few feet behind the baseline. For starters, walk back 4 big steps from the backline and start there.
Step 1: The Stance
Use the basic stance as taught in the above serves. Stand easily on both legs with both of them forming a ‘V’ shape with the left leg slightly in front of the right leg. Point your front leg in the direction you want to hit your serve. Shift your weight slightly towards the right leg.
Step 2: The Toss
Keep in mind that you will toss the ball first and then think about approaching the tossed ball to hit it. If you combine the two, your rhythm is likely to go off. So first, just think about tossing the ball.
Note that we have to meet the toss mid-air, after jumping off from the ground. Hence, you should aim the toss higher and further in front than you do in the standing serve. A general rule of thumb is to aim the toss so as to hit it right in front of the backline. This is because you will take off from behind the backline, hit the ball and then land inside the court. The service rule only requires that you start your jump from behind the back line.
Toss the ball approximately 5 feet up into the air and 5 feet in front of you. Keep experimenting with these distances based on your run up, speed and jump.
You may use any of your hands to toss the ball.
Step 3: The Approach
Now that the toss is underway, we need to make a small run up and jump to hit the ball while in the air. The three-step approach is an excellent way to serve the ball. Find it here.
Step 4: The Arm Swing
We will hit the ball with an extended right hand over and slightly in front of our head. Our position while hitting the ball looks like this:
Step 5: Hitting the ball
We will hit the ball as if we are giving it a firm “High 5”. You need to keep a big straight hand and contact the centre of the ball with the middle of your PALM. Make sure that your hand is firm and not sloppy. We want just one clean hit on the ball with one contact point.
HOW TO DO OVERHAND JUMP TOPSPIN SERVE?
The jump topspin serve is a direct combination of the jump serve and the topspin serve.
Step 0: Positioning
Since you will hit the ball while in the air, you will need a few extra steps to run and execute the serve. Hence start by standing a few feet behind the baseline. For starters, walk back 4 big steps from the backline and start there.
Step 1: The Stance
Use the basic stance as taught in the above serves. Stand easily on both legs with both of them forming a ‘V’ shape with the left leg slightly in front of the right leg. Point your front leg in the direction you want to hit your serve. Shift your weight slightly towards the right leg.
Step 2: The Toss
Keep in mind that you will toss the ball first and then think about approaching the tossed ball to hit it. If you combine the two, your rhythm is likely to go off. So first, just think about tossing the ball.
Note that we have to meet the toss mid-air, after jumping off from the ground. Hence, you should aim the toss higher and further in front than you do in the standing serve. A general rule of thumb is to aim the toss so as to hit it right in front of the backline. This is because you will take off from behind the backline, hit the ball and then land inside the court. The service rule only requires that you start your jump from behind the back line.
Toss the ball approximately 5 feet up into the air and 5 feet in front of you. Keep experimenting with these distances based on your run up, speed and jump.
You may use any of your hands to toss the ball.
Step 3: The Approach
Now that the toss is underway, we need to make a small run up and jump to hit the ball while in the air. The three-step approach is an excellent way to serve the ball. Find it here.
Step 4: The Arm Swing
We will hit the ball with an extended right hand over our head. Unlike the float or basic serve, we will contact the ball not so much in front of our head.
Step 5: Hitting the ball
Unlike the float serve, you will use your fingers alongside the palm to hit the ball. Your wrists will not be firm, but they will be free to move. Keeping your right elbow straight, contact the ball slightly below the center of the ball with your palm and simultaneously snap your wrist so that your hand wraps over the ball. Your hand will resemble a claw at this point. This snapping towards the end of the hitting is what applies the spin to the ball. I recommend practicing spinning the ball in your free time to get a hang of the claw-and-snap movement.
Frequently Asked Questions
How is the server for the first point of the match decided?
There is a coin toss before the match and the winner of the toss chooses either the side of court or preference for serve. Then the teams line up on the court based on the positions they have already submitted to the match official scorer. The player on the serving team at the back right of the court will serve for the first point of the match.
How does learning underhand serve help in improving my volleyball skills?
An underhand serve enables beginner players to have better control on the ball and helps improve confidence and make more rallies. This enables the players to focus more on setting, attacking and passing the ball.
How does learning overhand serve help in improving my volleyball skills?
The overhand serve makes you comfortable hitting the ball with one hand. This is useful during rallies, and you will feel more confident to return balls with your hand.
What are the pros and cons of a jump float serve?
Pros:
- The steeper angle you generate when you hit while jumping
- The float makes the ball move unpredictably
Cons:
- The accuracy of a jump serve is hard to master, and the error rate can be high
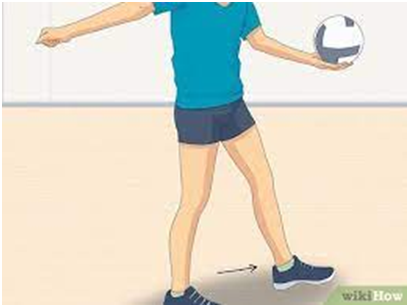
Why does my serve keep hitting the net?
You are probably hitting the ball further out in front of you than required. When you hit the ball, it should be only slightly in front of you like the image shown here.

If you contact the ball too much in front of you, your serve will often end up not having the required height to cross the net.
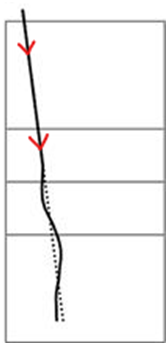
What is the Knuckleball effect?
This is an effect which occurs in all sports involving a moving ball. When the ball moves with little to no spin, the air around the ball moves differently over the smooth surface as compared to the part with stitches on. This difference in air pressure on different parts of ball creates the knuckleball effect, which makes the ball to waver sideways unpredictably while moving forward. This is exactly what happens in a float serve.
The image below looks like a typical trajectory for a knuckleball/float serve. Notice the slight deviation from the predicted dotted path, while the ball moves from the top of the image to the bottom.